Latest: Facebook Like Our Facebook Page For More Updates! | Twitter: @Tech_Terms
Showing posts with label wordpress. Show all posts

Saturday, 12 March 2011

Broken Link Checker Plugin for Wordpress

Your visitor came from search engine and Got a 404 error. This is the bad thing for website owner that his users are being disappointed. Everyone knows that with the passage of time, websites grows and pages are added continuously.


So, this is very common to get some broken links because sometimes we accidently delete some pages or some of our pages are expired due to many reasons. Then we should have to do something with these broken links so that the users may not get worried.


For wordpress users there are many broken Link Checkers are available but most of them have too many disadvantages. Today, while I was searching, I come across a very powerful and hand plugin named Broken Link Checker.


Broken Link Checker plugin


This nifty plugin runs in the background anytime you’ve got your admin console open, and produces a report in the dashboard if it finds any dud links or missing images. Each row in the table also has a number of options that allow you to fix the problem without leaving the admin console, so it’s quick and easy to fix them.


Configuration


As you can see, configuration is straightforward:


  • Status – this alerts you to any problems found, with a link to the management page. You can also manually restart the scanning process, although this should rarely be necessary.

  • Check every post – here you can configure how frequently your site will be checked.

  • Broken link CSS – until they are fixed, by default any broken links will be displayed as a visual cue to your visitors.

  • Exclusion list – I haven’t found a need to use this as yet.

  • Work session length – pretty self-explanatory!

  • “Delete Post” option – the plugin author doesn’t recommend you use this, and neither do I!


If you change any of these values, don’t forget to click the Update Options button.


Fixing broken links


The management screen displays a table, with each row representing a broken link or missing image. It looks like this:


Here’s a brief explanation of each of the columns:


  • Post – displays the title of the post or page which has the broken link

  • Link text – displays the link text

  • URL – displays the faulty URL, along with an Edit option for you to correct it

  • View – this allows you to view the post or page, as seen by your visitors

  • Edit Post – this takes you to the post editor so you can make changes in context

  • Discard – this removes the row from the table, although it will reappear with the next scan if the link hasn’t been fixed.

  • Unlink – this gives you the option to remove the link from the post, whilst retaining the link text.

Monday, 30 August 2010

12 Wordpress Plugins for Google AdSense

Every blogger wants to get something in return for the efforts and time he put in to his blog. Everyone wants to generate a decent income from his/her blog. Though there are a lot of methods for monetizing a blog’s traffic, Google Adsense is still the most popular and widely used method of monetization. If you are already using Google Adsense on your blog or still planning to use it then here are the 12 wordpress plugins for Google Adsense which will help you in managing the ads on your blog more effectively and to increase your Google adsense earnings.


-    Adsense Manager: - This is one of the most popular and widely used of all the Wordpress Plugins. It is essential for Adsense management in the Wordpress Blogs. Adsense Manager also supports other programs like YPN and Commission Junction. With this plugin, you can insert Adsense code at any place in your blog.

-    Google Adsense for Feeds:  This is a Wordpress Plugin that adds Adsense to your feed automatically without any effort. It is a great alternative to Feedburner Adsense ads.

-    Adsense Immediately:  With Adsense Immediately, you can increase the adsense income of your blog.  This plugin allows you to easily insert Adsense Ads into the body of your content.

-    Adsense Attachment Page: This plugin helps you to show attachments with thumbnail images to enable the page to appear in full size when you click on it. It is an avenue for you to show large images in new Windows with an Adsense Attachment Page.

-    Adsense Earnings Wordpress Plugins: This is a great plugin to check your Adsense earnings within the Wordpress Admin Panel. It can be used to check your earnings in your Dashboard or Options page and show the public what your revenues are.

-    Shylock Adsense Wordpress Plugin: This plugin helps you in inserting Adsense ads on your blog without modifying the template. You can also set the number of days you want to show Adsense Ads on your articles.

-    All in One Adsense and YPN: This is used to add Google Adsense ads or Yahoo Publisher Network (YPN) ads to your post automatically irrespective of the number of pages. With this plugin, it is possible for you to stop ads from showing in some pages if you so wish.

-    Adsense Deluxe: Adsense Deluxe for Wordpress Plugins is used mainly for quickly adding Google or Yahoo ads to your blog. This is an easy to use plugin, particularly for Wordpress 1.5 and Wordpress 2.0.

-    Googmonify: - This is a Wordpress Plugin that gives you the opportunity of inserting Google Adsense Ad Units into your posts with the aid of some tags that are very easy to use. You can also to track your ads to get accurate knowledge of your ads’ performance.

-    Who Sees Ads: - This is an advanced ad management plugin which allows you to determine who will view your ads based on the user defined conditions or context (A state of affairs dictated by you to display or not to display an ad with Who Sees Ads).

 -   Author Adsense: - This is very useful Plugin for group blogs  or for blogs having multiple authors . With the help of this Plugin, every author can easily insert their Google Adsense Publisher ID  to their own posts.

-    More from Google: - Allows you to identify a search term for each post you make. The search term is used to create a link at the bottom of your post which in turn links to search results that you have already created. This will motivate your readers to Google for related articles without leaving your site.  This can generate revenue for you in the long run from Adsense for Search.


Are you already a Google Adsense publisher and using any other wordpress plugin then feel free to share it with us in comments below.


Guest Post By: Gagan


Gagan works for Go-gulf.com, a web design kuwait company that provides web design solution in Middle East.

Saturday, 28 August 2010

How to verify a wordpress blog for webmaster tools

When we talk about SEO of WordPress, one important thing is submission of sitemap to search engine like Google, Bing, Yahoo, Ask and so on. Submission of sitemap will make sure your website will get indexed properly and Google bots can crawl your internal links without any issue.


Robots Meta is one useful plugin which I personally recommend for SEO optimization of your blog and I use it  on most of my WordPress SEO work. Apart from noindex, nofollow attribute, Robots meta wordpress plugin can also be use to edit your robots.txt file and .htaccess file.


One important thing which you can also achieve by using Robots meta plugin is verify your Google webmaster meta .


When you add your Site into Google webmaster tool, it ask you to verify your site using meta tag or by uploading a simple HTML file. Verifying with meta tag is very easy. Before starting this process, Install Robots meta wordpress plugin into your blog.


Follow these simple steps :


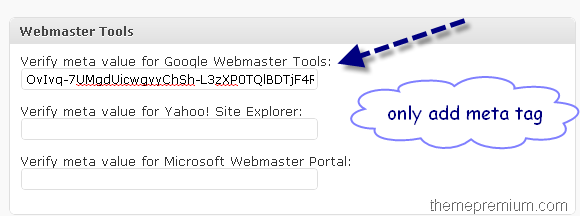
Add your site to Google webmaster tool, on next screen when it will ask for verification, copy the meta tags from the code. Follow the screenshot :


 Now open your robots meta settings from your dashboard and add the part which is highlighted into the section which says : Verify meta value for Google Webmaster Tools:


 Click on save and now on your Google webmaster tool, click on verify and submit your sitemap and configure other settings to optimize your WordPress blog for SEO.

Friday, 4 June 2010

Best Free Wordpress Adsense Ready Theme

Google shows a huge no of searches regarding best and free wordpress adsense ready themes. No doubt, there are several wordpress themes are available that are best to maximize google adsense earning such like Adsminded, Freshbrown, prsense and palmixio


But today, I am going to share with you the best and free wordpress adsense ready theme that has great features inside it. All the features are given below.


 Technogati AdsenseReady  V1.2 (New)


screenshot adsenseready1.2 300x218 WP Themes


AdsenseReady V1.2 has created with the aim of including several features which we knew most bloggers would find useful. One of these is the freedom to choose which type of ad units should be automatically displayed.


While designed to effortlessly incorporate a large amount of Adsense ads, AdsenseReady v1.2 allows you to have complete control over the amount of ads displayed and therefore is even suitable for bloggers who are not seeking to heavily monetize their blogs.


Here are some of the theme features, some of which are currently exclusive to AdsenseReady v1.2:


  • Separate and Distinct Ad Blocks. The use of distinct theme files for ad codes allows for easy editing and insertion of Adsense units. These ad blocks can also be used to insert other types of advertisements as well and are not solely limited to Adsense use.


  • Multiple Ad Display Options. Unlike other Adsense Ready themes, AdsenseReady V1.2 allows you to choose between either banner or rectangle ads for the single post page, thus allowing you more flexibility when it comes to ad blending.


  • Hassle-free convenience and ease of use. You’ll only have to insert your Adsense code in the default ad units and you’re done. It should only take a minute or two to set up AdsenseReady V1.2 perfectly.


  • Integrated Ad placement. Unlike most Adsense ready themes currently available, AdSenseReady V1.2 blends a 729 x 90 banner unit at the top  and after first post  on the blog homepage and link units near navigation area and near the comment section.Sidebar is really awesome for ads.You can place ads 300×250 near subscription box and 600×160 adsense unit under widgets on left sidebar.


  • Compatible with Wordpress 2.0+. AdsenseReady V1.2 has been tested with the latest Wordpress 2.8.4 and no problems were experienced.


  • Widget-Ready. If you’re a widget lover, you’ll be happy to know that AdsenseReady V1.2  allows you to easily install and use widgets to complement your content and advertising scheme.


  • Free Lifetime Support:Support for the lifetime is available for AdsenseReady theme.


Download Technogati AdsenseReady


Demo

Friday, 28 May 2010

FreshBrown Free Wordpress Theme By TricksDaddy

I was Googling last night so i found this great wordpress theme. Check it and then comment on it.


Screenshot


FreshBrown is a 3 column + 2 column wordpress theme with premium looks. It features a premium look and its best for technology related blogs.


Features :


  • 3 + 2 columns

  • Premium looks

  • Widget ready

  • Fluid width

  • 3 widgets in footer for placing more content

  • Space for 468×60  advertisement banner in the header

  • Space for 125×125 ad blocks in the sidebar

  • Supports comments threading and paging

  • Fully compatible with Wordpress 2.9

  • Less graphics to make it load faster

  • Free of cost


Installation :


  • Download and extract freshbrown.zip file in a folder.

  • Now upload this folder to ‘/wp-content/themes’ using FTP client.

  • Now login to your Wordpress admin panel and go to Appearance -> Themes.

  • From the list given, activate freshbrown theme.


Links :


Demo | Download From Mediafire

Wednesday, 21 April 2010

Top 5 wordpress themes

Opening Information: I spent all of last night (about four hours) searching for quality WordPress themes. After this search, I wrote the below list of the sickest WordPress themes on the web. Some are and aren’t free (one isn’t). Each has a text label stating whether or not they are free.


I hope you enjoy this list.


Neatty – Download


My Rating – 4/5


Price: Free


Neatty

Neatty Theme


Description of the “Neatty” theme…


Specifacations: 2 Columns, Adsense Ready, By Lorelei, Left Sidebar, WP Themes Widget Ready


A decent theme that’s free of charge. It offers flexibility to it’s bloggers, and provides a diverse look. All in all I give this theme a four out of five rating. Why not a five? The only reasons is because it can act buggy in some situations. One of the bus don’t correctly align the text around images. Other then these minor issues this is an excellent, sick theme.


Monday, 5 April 2010

Top 10 tips to promote your wordpress blog

1. Title Tags: Basic step for seo, you must follow this step to optimize your post for search engines. For this purpose you should use All in One Seo Pack Plugin. In my opinion, your traffic can be boost upto 100% with this plugin because this adds all the necessary info that are required for seo.

2. One thing more that we always ignore is URL structure that how search engine will get our website indexed and craweld. Decide between the www and non www versions of your site, and redirect one of them to the other use the Redirection plugin to manage all your redirects. But remember that to get benefits from your old url's you should use 302 permanent redirect.

3. Sitemap: What a sitemap actually does?? We can see the links for a site that are visible by design, but this is not necessary for a website to show all urls on all pages or at, at least, home page. That's why we create sitemap to knwo search engines a site complete. You can make a wordpress sitemap with the help of Google XML Sitemaps Plugin.

4. Put your keywords in the H1, H2 Tags: In fact, H1 and H2 tags tells search engines the summary of your post. SO, you should use all your main keywords in Heading tags so that search engines can find the subject matter.

5. Include your keywords in the url of the page: change your permalinks to include the %postname%. To do this, just go to dashboard and click on permalinks and then change as mentioned. This will Really increase traffic.

6. Link to other relevant pages in your site include your keyword in the anchor text, rather than ‘click here’ , with related posts plugin. As you can see that 5 related posts are given at the end of every post that increase stay time for a visitor. This happens when a user finds your post helpful, then he decides to crawl other posts related to current topic.

7. Optimize your images, by giving them relevant names, and using the alt tags to describe your image. You can use SEO Friendly Images Plugin for this purpose. You can see images on my website for this purpose as well.

8. Bookmark your site at Digg, StumbleUpon and Propeller. If you want to bookmark your site on more sites, use a free tool like Onlywire or SocialMarker

9. Submit your rss feed to rss directories. This will help your blog to be indexed quickly by search engines. RSS, actually, tells search engines that new post or page has been created.

10. Find some large forums in your niche and participate in them. Include a link to your site in your forum signature such like Digitalpoint, sitepoint, v7n forums.com

Friday, 2 April 2010

Your wordpress blog must have these SEO plugins


SEO, SEO, SEO. In fact, real traffic of a website is that which comes from search engines just like google, yahoo, msn etc...  So, you have to optimize your wordpress blog to make it search engine friendly. There are several methods to do seo but today, I will explain the functions of best seo plugins for wordpress that will make your blog populated.


I have used blogpsot blog, wordpress blog and static html website, but from all of these wordpress gets indexed quickly as compared to others. So, you should use these plugins to get indexed by search engines and get a lot of traffic.


Search engine optimization for wordpress


1. All in One SEO Pack


This allows you to set the basic SEO stuff for your blog. You need page titles, meta tags, keywords, and descriptions. This plugin allows you to configure them for either your entire blog or on a post by post basis.


2. Redirection


From time to time you make changes on your blog. Sometimes these changes end up breaking your Permalink structure. This often happens when you make a change to an old post, or do an upgrade to Wordpress and make some changes to the permalinks. It’s very very common if you move your blog from one host to another.


Basically what happens is that each post has a unique URL, called a permalink. When this changes, visitors who go to that blog post won’t find it. The redirection plugin helps you fix these problems by redirecting the visitor to the new permalink. This reduces the amount of traffic you get to pages that don’t exist.


3. Robots Meta


By default search engines crawl and index ALL the pages on your blog. This isn’t ideal, because it creates duplicate content and you can get yourself punished by search engines without knowing it. What the Robots Meta plugin allows you to do is tell the search engines which sections of your blog to crawl. This means that you’ll get more respect from search engines, and likely more traffic.


4. SEO Smart Links


One of the key issues with SEO is your internal linking structure. The more you link to a certain page on your blog, the more important it is to your overall content. Search engines treat your internal links as an indication of how well structured your site is. The problem with this is that if you had to manually go and create links to relevant and important posts you’ll spend hours and hours doing it.


SEO Smart links allows you to specify a word, like ‘SEO’ and then link it to a post on your site. Then each time the word SEO appears on your site, it’s automatically turned into a link you specified.


5. SEO Friendly Images


Images also play an important role in your SEO strategy. So it’s important that you tag them correctly. SEO Friendly images allows you to do this, and saves you hours and hours of work. If, like most bloggers you use images in your posts, then this plugin is essential.


6. Google Positioner


It’s important to know your keywords. And this handy plugin allows you to track the keywords you’re getting searches for. It’s pointless selecting a few keywords, then writing some content for those keywords and hoping that the rest goes well. SEO is about being proactive and tracing what works and what doesn’t.


7. Permalinks Moved Permanently


A common mistake bloggers make is choosing the wrong permalink structure. When you start your blog you think you know which is best, and as time goes buy you want to change your permalink structure. The problem with changing your permalink structure is that your traffic will come to a standstill until your site is reindexed, and that could take months.


This plugin is similar to redirect but is an easier and better way to manage permanent permalink changes.


8. Nofollow Case by Case


The nofollow attribute over the last year or two has had a fairly large impact on the blogosphere. All comments in Wordpress by default are nofollow links. This means that no Page Rank (PR) is being given via the link. This plugin changes that and makes comment links valuable again. There are a number of reasons you would want to give away link juice. It’s often used to attract people and encourage them to comment. It can be very useful for new blogs who need some exposure.


9. SEO Slugs


Stop words are ignored by search engines. So most of your post titles have them in, but they are meaningless to search engines. So when you have a post title like this: “What You Can Do Immediately For Higher Rankings” you have a permalink like this: ‘/what-you-can-do-immediately-for-higher-rankings’ but what you really want is for your permalink to look like this: /immediately-higher-rankings.


This plugin automatically removes stop words from the permalink, helping you to rank better.


If you feel this post helpful then why not tweet or digg it. Your comments are welcomed.

Monday, 8 March 2010

Adsense Ready & SEO Friendly Wordpress theme

ads minded adsense ready and seo friendly theme for wordpress


AdsMinded Wordpress Theme Review


I am using this nice wordpress theme on my one of blog that is the best adsense ready theme. 


This theme is SEO optimized plus you can customize the layout and ad placement several ways. On one of my blogs, I left out the 2nd column with the Adsense ads on the main page. They’re only visible once a surfer clicks through to read the entire post. Also, there are several other areas where you may put other affiliate codes from other companies. This really maximizes your earnings potential!


This 3 column layout comes with an optional square ad placement on top of the sidebars. It comes with some very useful Wordpress plugins. The best thing about his website is ad link unit on top of the theme that looks like a menu bar that gives best CTR. Well this gives highest earning.


I am using this wordpress theme with these plugins


  1. All in one SEO

  2. Google XML Sitemaps

  3. DIgg Digg

  4. WP Page Navigation

  5. FCK Editor


Demo | Download | Edited Version

Friday, 5 March 2010

ProSense: An Adsense Ready SEO Wordpress Theme

Prosense is the best adsense ready seo friendly theme for wordpress. You can download it for free. If you have any question then feel free to comment here.


prosense-theme-homepage.jpg


A Guide to the Prosense Theme Features


Prosense was created with the aim of including several features which we knew most bloggers would find useful. One of these is the freedom to choose which type of ad units should be automatically displayed.


While designed to effortlessly incorporate a large amount of Adsense ads, ProSense allows you to have complete control over the amount of ads displayed and therefore is even suitable for bloggers who are not seeking to heavily monetize their blogs.


Here are some of the theme features, some of which are currently exclusive to ProSense:


  • Separate and Distinct Ad Blocks. The use of distinct theme files for ad codes allows for easy editing and insertion of Adsense units. These ad blocks can also be used to insert other types of advertisements as well and are not solely limited to Adsense use.

  • Multiple Ad Display Options. Unlike other Adsense Ready themes, ProSense allows you to choose between either banner or rectangle ads for the single post page, thus allowing you more flexibility when it comes to ad blending.

  • Hassle-free convenience and ease of use. You’ll only have to insert your Adsense publisher ID in the default ad units and you’re done. It should only take a minute or two to set up ProSense perfectly.

  • Integrated Ad placement on the homepage. Unlike most Adsense ready themes currently available, ProSense blends a 468 x 60 banner unit between the second and third post on the blog homepage.

    This enables you to display relevant ads to search visitors who arrive at your homepage, as they are more likely to scroll and scan through your posts.The inclusion of a well-blended horizontal link unit near the top of the homepage also attracts navigational-style visitor clicks.


  • Highly Optimized Ad units on post pages. There are two types of ad blocks on both the top and bottom of the single post page. You can choose between using a 468 x 60 banner and 300 x 250 rectangle at the top of the post or a 468 x 60 banner and 336 x 280 large rectangle at the bottom of the post.

    The ability to designate and match different ad units is exclusive to ProSense and is currently not available for other Adsense Ready themes.


  • Pre-blended Adsense unit colors. All Adsense unit colors are tweaked to match the blog’s link and background colors. There is absolutely no need for you to spend time picking the appropriate ad colors.

  • Search Engine Optimized site structure. ProSense is built from good, clean code that validates well. The CSS positioning is written so that your blog content is prioritized in the source code as this may help to improve search engine crawling and ranking. Dynamic and descriptive title tags are also used for each blog page.

  • Compatible with Wordpress 2.0+. ProSense has been tested with the latest 2.2 Getz version of Wordpress and no problems were experienced.

  • Widget-Ready. If you’re a widget lover, you’ll be happy to know that Prosense allows you to easily install and use widgets to complement your content and advertising scheme.


prosense-theme-single-post-page.jpg


Important User Notes


Please remember to change the Publisher ID for the default Adsense units after you upload the theme! You’ll need to insert your personal Adsense publisher id (e.g. pub-xxxxxx) in the various Adsense units that you decide to use.


All the ad units are found in the following theme files:


Single Post Pages:


  • adsense_singlepost_top_square.php – 300 x 250 Medium Rectangle

  • adsense_singlepost_top_banner.php – 468 x 60 Banner

  • adsense_singlepost_bottom_square.php – 336 x 280 Rectangle

  • adsense_singlepost_bottom_banner.php – 468 x 60 Banner


Homepage:


  • adsense_sidebar.php – 160 x 600 Skyscraper

  • adsense_homepage_linkunit.php – 468×15_4 Link Unit

  • adsense_homepage_banner.php – 468 x 60 Skyscraper


Alternate Color Schemes for ProSense


For those you would prefer a different color scheme, we’ve also provided Prosense in a clean blue or gray color combination so feel free to download these versions if they find them more to your liking.


prosense-gray-single.jpg


prosense-blue-home.jpg


Download ProSense | ProSense Blue | ProSense Gray | Demo Page

Friday, 26 February 2010

Woo themes Mainstream Free Wordpress theme


A vibrant personal blog theme with a colourful selection of styles, built on WooThemes flexible theme framework, boasting a selection of theme options, most importantly it’s FREE!


I think this is the best free wordpress theme that looks like a premium wordpress theme. Anyway download it and enjoy it.


If you fee any difficulty with this theme tell us in comments.


Download Free Mainstream wordpress theme

Popular Related Post Plugins for Wordpress

Are you a blogger, you are running your blog in wordpress platform?.
This post is very useful for you. In wordpress blog without plugins, it is very tough to run your wordpress blog. Why? Because for adding more features to your blog, you have to install plugins in your wordpress blog.


Ok Come to my point. In this post I am going to show you about some best wordpress related posts plugins. It is very useful for your blog.


Example: Visitors reading your post, after finishing reading, this plugin will show related posts of your visitor reading post. So it is very useful for reader and your blog also.


1. Related Post with Thumbnail (Wp-Thumbie)
2. Related Post by Category
3. Search Engine Related Post
4. Related Post by Tags
5. Efficient Related Post


Related Post with Thumbnail:


Display a list of Thumbnail related posts for the current post.


You can select the number of posts to be display in your content / feed.


You can choose to exclude posts from certain categories as well as exclude pages.


Features


  • Display Related Posts with thumbnail image automatically in content / feed, no need to edit template files

  • Doesn't use any custom field to generate thumbnail images

  • You can manually add code to your template where you want the Wp-thumbie to be displayed

  • Exclude posts from categories

  • Exclude display of thumbnail related posts on Pages

  • Exclude pages in thumbnail related Posts list

  • Related posts based on content and post title

  • Set Thumbnail image sizewordpress related posts plugins

  • Turn on/off Post excerpt

  • set lenth of Post excerpt

  • Different Styling for displaying thumbnail related posts

  • Display Thumbnail related posts in RSS Feeds (Styling issue)


Search Engine Related Post:


This plugin is used to display the search engine related post. That means when someone is referred from a search engine like Google, the plugin show your blog content matched the terms they search for. It is very useful plugin.


Related Post by category:


Related Posts by Category lists similar posts within any post. As a search string the plugin does not use the title of the article nor weighs the content. In fact the category, which was assigned to the post, serves as the source of accordance.


Features


  • Very fast execution

  • No user interface required

  • Post thumbnail integration (WP 2.9 or older)

  • Quick query in only one sql statement

  • Quantity of results and further options are adjustable

  • Foolproven implementing of this plugin


Related Post by Tags:


This plugin provides a sidebar widget containing posts with the thumbnail and post excerpt (POST + THUMBNAIL + POST_EXCERPT) which have similar set of tags as the tag set of the current post


The widget displays on single pages only.


For example, if a post has the tags "tag1", "tag2", and "tag3", and there are other posts in the system with the same tags, those posts will be displayed. If there are not posts that have all three, but some with two of the three, those will be displayed. The sort order for posts with the same number of matching tags.


Efficient Related Post:


There is a problem with related posts plugins, and Efficient Related Posts is fixing that by approaching the problem from a different direction and offering a very different solution.


Basically, current related post plugins build the list of related posts on the fly when the user needs to view it. Since blogs tend to be viewed far more often than they are updated (often hundreds of times more often), these queries are run way more times than they need to be. This not only wastes CPU cycles, but if the queries are slow (which they will be if you have 1000s of posts and tags) then the user gets a poor experience from slow page loads.


Efficient Related Posts moves all this effort into the admin section, finding related posts when a post is saved rather than when the user views it. The advantage is that if the query is slow it happens less often and the post writer is the one that waits rather than the user (which I think is WAY better).


There are limitations. For example, since the related posts are stored as post meta data, we only store a certain number of them (10 by default, but you can set it to whatever you want). This means that if you decide you need to display more than 10, you need to have the plugin re-process all posts. I generally display up to 5 related posts, but store 10 just in case I decide to display more in some areas. Also, since the related posts are calculated when a post is saved, manually adding a tag through the database will have no effect on the related posts, although I recommend not doing that anyway.

Sunday, 21 February 2010

Thesis theme alternative--->Free SEO WordPress Theme Ad Flex Blog

I am using Thesis theme which is very expensive and a beginner can't afford this theme.


I have searched a lot about wordpress adsense ready and seo ready themes and now I have found a theme that is the best alternative of thesis wordpress theme.


Yes, the theme is Ad Flex Blog .The WordPress theme Ad Flex Blog was developed by Van Kham CHIEM at VK Labx, a creativity, tech and wellness research laboratory owned by VK Solutions..


After testing this theme, I think this is the best alternative


of thesis theme that is absolutely free and 100% customizable as thesis theme. It has a lot of options that thesis does not contain.


Anyhow, you can find all the options that this theme gives here.


Easy Straight Forward SEO AdSense


This WordPress template with AdSense is easy to use and provides you with a straight forward way to increase your AdSense CRT, and a nice looking design for your Blog. It can be used to combine AdSense and WordPress as well as other Ad banners like Amazon shop or any other affiliate products from affiliate programs.


The AdSense friendly WordPress theme Ad Flex Blog is free to use and it comes with the following techie features:


Ad Flex Niche and Ad Flex Blog are both SEO Search Engine Optimized to target the best rank possible in Google search engine. The target is of course the Google Top 10.


AdSense Ready


Ad Flex Blog is AdSense Ready. You can easily add several AdSense banners and 1 AdSense Link Unit and without any WordPress plugins. Putting AdSense on WordPress is as easy as installing the WordPress theme.


AdSense Adjacent Images


Ad Flex Blog lets you easily add 8 images (or more) adjacent to your AdSense banners to increase your AdSense CRT. The 8 images are randomly sectionned from your own set of images (10, 20, 50 images or more). It's as easy as dropping your images in a folder to have them taken into account by Ad Flex Blog.


Random Banners


Ad Flex Blog displays random banner images. Everytime the page is displayed or refreshed, a new banner image is randomly displayed takenfrom your own set of banner images.


Random Backgrounds


Ad Flex Blog displays random background images. Everytime the page is displayed or refreshed, a new background image is randomly displayed from your own set of background image.


Stat Counter


Ad Flex Blog eases the inclusion of a stat counter. You can add the code for your stat counter(s) via a user friendly administration interface and your stat counter is just integrated to Ad Flex Blog.


RSS Feeds


Ad Flex Blog lets you easily add RSS feeds. You can add the code for your RSS feeds via a user friendly administration interface and it will be displayed in a fully integrated way with the Ad Flex Blog theme. Your RSS feeds will appear just at the end of your article/post content.


Newsletter Ready


Ad Flex Blog is read to be integrated with your own Newsletter service. You just need to add the Newsletter code to have it appear instantly as the first section of the sidebar.


Exhaustive Customization Parameters


Ad Flex Niche comes with an exhaustive list of more than 200 customization parameters that can be managed via the WordPress dashboard.


You'll see the special tab Ad Flex Blog Options located accessible via your WP Admin / Presentation lets you customize the Ad Flex Blog to fit your taste, colors and needs. You can for instance set the following parameters via WP Admin::


This theme can be customized as much you want. Try it and give comments about this theme.


Download Ad Flex Blog SEO Adsense Ready Theme

Thursday, 18 February 2010

How to make a wordpress website! Complete Guide for installation of Wordpress

WordPress is the most professional and the most customizable blogging platform. Installing self-hosted Wordpress will definitely help you create a great blog.


I have also a Good blog and I think most of the users want to make a blog like this. Actually, I have wordpress blog but I have also some contents that may fit in a static html website but wordpress is handling perfectly.e.g. I have a page with contents that can't be fit with two side bars then I made a "No Sidebars" template and make a page like this.


Now, the question is "How can I make a wordpress blog??"


Before we take a look at the answer You need some prequsites.


  1. A Domain

  2. Hosting Account

  3. Wordpress Software

  4. FTP Software

  5. A text Editor(Notepad++)

  6. A little knowlege of cpanel


Domain Name


In my opinion, to choose a domain name is the most important point to become a successful blogger and to get high search engine traffic. So, you should have to choose a domain that matches with your blog contents or the topic in which you are interested. e.g.


You are going to make a blog about "Wordpress Blogging" then you should choose  domain name like dailyblogger, bloggingtips, blogblogging, wordpressblog, wordpresstips, wordpressblogger etc...


Here You can purchase the cheapest domain names from us. Cheapest Domain Names


Hosting Account


Most of the internet users are trying to find free hosting but remember that Nothing is free in this world. You should choose a paid hosting company so that you are protected against account suspension from free hosting company.


Hosting should be more reliable and you should choose a company that provides 99.99% uptime. We are also providing cheapest more reliable hosting that will lead your blog at the top.


Hosting Packages


Check it then select a Package.


Logging in to cpanel


You need FTP settings for some settings or if any mistake you made then you can recover from ftp software and you can control all your website through this. Anyway now we are going to log in to cpanel But you should have at least these three thins.


  1. Cpanel URL e.g. adsenseurdu.com/cpanel

  2. You user name e.g. xyz

  3. Your password


When you are logged in then move to next step.


Create a MYSQL Database


  • Click on MYSql Databse wizard

  • In First step you will have to give Database Name e.g wordpress(But later this will be merged with your user name just like adsenseu_wordpress, if you are using cpanel)

  • In next step, you have to enter user name and password for the database that will be used in wordpress installation later. Put the password that should be alphanumeric because of security purpose.

  • In last step you should use check on all previlags for a database tables.

  • Just save Database info in your notepad for later use.


Download Wordpress Free Software


Wordpress is the best blogging software that is available for Free. You can Download here(Always link to Latest version)


In future you will not need to download the latest version but you will be able to install updates right from your dashboard.


Configure wp with your DataBase


You will find a file named wp-config-sample.php and then rename this file to wp-config.php


Open wp-config.php in text editor (like NotePad++) and find this part:


// ** MySQL settings – You can get this info from your web host ** //
/** The name of the database for WordPress */
define(‘DB_NAME’, ‘putyourdbnamehere‘);
/** MySQL database username */
define(‘DB_USER’, ‘usernamehere‘);
/** MySQL database password */
define(‘DB_PASSWORD’, ‘yourpasswordhere‘);
/** MySQL hostname */
define(‘DB_HOST’, ‘localhost‘);


Put here all the info that you saved in your notepad for your use.


  • Your MySQL Database Name should replace putyourdbnamehere

  • Your MySQL User Name should replace usernamehere

  • Your MySQL password should replace yourpasswordhere

  • Your MySQL Host Name should replace localhost

  • Save wp-config.php


Wordpress Installation


Just visit this URL to install wordpress http://www.yourdomain.com/wp-admin/install.php and replace www.yourdomain.com with your domain e.g. http://www.adsenseurdu.com/wp-admin/install.php


You will Find the wizard as shown Below


  • Fill in your Blog Title

  • Fill in Your E-mail

  • Make sure your Allow my blog to appear in search engines like Google and Technorati is checked

  • Click on Install WordPress

  • Next screen you see should say Success! and should give you your Username and Password.

  • Click on Log In.

  • Now you will see your blog’s Log In page. Make sure to bookmark that URL.

  • Fill in the Username and Password you have just received

  • Click on Log In.


Now you will see your WordPress 2.9.2 Dashboard where all the optimization, customization, post writing, plugin installing, comment moderating takes place.


This means your blog has been setup and is live online. Check your http://www.domainname.com to see it. You will also get an email titled New WordPress Blog which includes your URL and your username / password. Enjoy your WordPress 2.9.2 blog!

Wednesday, 3 February 2010

A complete list of blogging software and blog generators of 2010

I love wordpress. Do you know why?? Because wordpress is as much as customizable as we can't think.  But no one can say that we should use wordpress. There are many other blogging software or blog generators that have huge no of users such as blogger,typepad and B2evolution.


Anyhow, here is a great list of all blogging software or blog genrators. Please comment on this post and tell me any other blogging software or blog generator.


Free hosted


You can create your blog without paying for hosting or domain name.


Blogger
Blogs Arena
Live Journal
MSN Spaces
tBlog
Vox
Wet Paint
Wordpress


Free & requires hosting


This software is free but you will need hosting and a domain name


B2Evolution
Bblog
Blog CFM
Blojsom
Blosxom
Life Type
Moveable Type
Serendipity
Wordpress


Pay requires hosting


This software you have to pay and also host yourself


Blog Hoster


Pay hosted


There is a charge for this software, but you don’t have to pay for hosting


Squarespace
TypePad


All CMS blog software


Drupal
Mambo

Tuesday, 2 February 2010

Top rated Free Wordpress SEO theme eMoms Legacy 1.0


top rated best wordpress seo theme


This theme has been rated 100/100 in regard of seo. So, download it, install it, configure it and enjoy seo for your wordpress blog.


Download Top SEO wordpress theme

Sunday, 31 January 2010

How to Extract Names and Email Addresses From Wordpress comments

Lot of people are searching this. Actually, when your blog grows up and you want to send e-mails for marketing or any other purpose, then you need to extrat e-mail address from wordpress comments.


This is a nice idea to do this.


For this


1-just login to your capnel and click on phpmyadim


phpmy admin will look similar to this window


Now you can extract email address from wordpress comments


2-Now, select your database, in this example we will select _wdp and click on it. then the screen appear will same as below one.


From the list given in left sidebar, just select "wp_comments"


Now you can extract email addresses from wordpress comments


3-choose "comment_approved(Ascending)" from "Sort by key" drop-down box which will sort the comments that you have approved instead of spammy comments.


[caption id="attachment_357" align="aligncenter" width="525" caption="you can exctract email addresses from wordpress comments"][/caption]


4-Now scroll down and click on Export button


you can extract email addresses from wordpress comments


5-you can save this file as an Exel(.xls) file as well as csv file so that you can import all email address to yahoo,msn,gmail,etc...


you can extract email addresses from wordpress comments


Now you can import this file from yahoo,gmail or hotmail account.


Now start email marketing righ now. If you find this helpofull for you then leave a comment.

Thursday, 21 January 2010

Free Wordpress SEO Ebook for Beginners

Some acquaintance / friend like me asking how to optimize a blog for it to be indexed by search engines with a good position, that is on the first page.
I hold the light just is not SEO experts who know the specialty search engine algorithm. I learn to use wordpress blog I also make a new start at this blog, after that I created several blogs to find money.
Previously I had to write about SEO for the visitor to become quite popular after the publication by Cosaaranda. Have tried to apply but who do not get satisfactory results. Indeed, SEO is the way god drunken incoherence, but still needed the basics of SEO to optimize a blog so easily indexed in search engines.

During this every time I finished installing the wordpress blog, I always modify the blog that the steps are simply imitating the Free E-book SEO For Wordpress Beginner's BlogOhBlog owned Jai Nischal Verma


Download Free Wordpress SEO Ebook for Beginners

Friday, 15 January 2010

How to show AdSense Ads After First or Every Post in Wordpress Blogs

This is the most searched and frequently asked question that How can add google ads at home page after posts.


To do this, You need to edit famous wordpress loop. Such a loop can be found in your current wordpress theme’s index.php. There may be other files present in your theme directory which uses loop like archives.php. They may need to be updated as well.


Listed below are steps to edit loop in index.php file. Similar steps can be performed for other files too, if required.


1. Go to Wordpress Dashboard >>Design >> Theme Editor.


2. Click on index.php or Main Index Template file. It will open in Theme Editor on left.


3. Find a line:


<?php while (have_posts()) : the_post(); ?>

4. Add before it:


 <?php $adcount = 1; ?>

5. So final code will look:


<?php $adcount = 1; ?>

<?php while (have_posts()) : the_post(); ?>

6. Now find:


<?php endwhile; ?>

7. Add before it:


<?php $adcount++; ?>

8. So final code will look:


<?php $adcount++; ?>

<?php endwhile; ?>

9. Now inside loop, i.e. after “while” line but before “endwhile” line put your AdSense codes. Exact location depend on your choice between ads before post, ads after post, etc. Important thing is you have to put your AdSense code in a if-block. below is an example…


<?php if ($adcount == 1) : ?>

<!-- Put Your AdSense Code here -->

<?php endif; $adcount++; ?>

That’s it. Save changes and check if it works.


Variations…


1. If you want to put ads after first two post…


In step 9 code, Change $adcount == 1 to $adcount == 2


2. If you want to put ads after first three post…


In step 9 code, Change $adcount == 1 to $adcount == 3


3. If you want to put ads after each post…


In step 9 code, Change $adcount == 1 to $adcount == 3. Yes this is same like above. Because AdSense only allows maximum three ad-units on a a single page. This way you avoid blank space created after each post when you directly put AdSense code after each post.


If any problem, just contact me at jamshed_206@yahoo.com

  • MBT Icons and buttons

    Tips And Tricks

    Our resources have been successfully got many tricks and tips and shared here too much. Check Yours!

  • choosing webhost for a blog

    Mobile Zone

    Mobile Reviews Shared with thier latest tricks and tips!

  • SEO Settings for blogger

    SEO

    Learn every single SEO tip that will boost your blog's ranking and organic traffic. We got them all!

  • Blogger widgets and plugins

    Check Softwares

    Why not take a tour of all great softwares? You Name it we have it!

  • become a six figure blogger!

    Get Facebook Tricks

    Learn Facebook Tricks!